ELA Paint Shop Pro Notes
CONTENT BY TYPE
BACKGROUNDS |
CROP |
IMAGE MAPS |
LAYERS |
FILE FORMATS |
FILTERS |
PREFERENCES |
SIZE |
INDEX - ALPHABETICAL
B |
C |
L |
M |
R |
T |
V |
Background vs. Background Layer Background |
Coordinates Image Maps |
Cropping an Image Crop |
Layers Introduction |
Layers Properties dialog |
Mosaic Filter |
Resize Size |
Resize Dialog Size |
Transparent Gif File Format |
Viewing Preferences |
BACKGROUNDS
Background vs. Background Layer |
CROP
Cropping an Image |
IMAGE MAPS
Coordinates |
LAYERS
Introduction |
Properties dialog |
FILE FORMATS
Gif |
FILTERS
Mosaic |
PREFERENCES
Viewing |
SHORTCUTS, KEYBOARD
|
TOOL or BRUSH |
KEYBOARD SHORTCUT |
|
Zoom (Magnifier) |
g |
|
Deform |
d |
|
Crop |
r |
|
Mover |
v |
|
Selection |
s |
|
Freehand Selection |
a |
|
Magic Wand Selection |
m |
|
Eye Dropper |
y |
|
Paintbrush |
b |
|
Clone |
n |
|
Color Replacer |
, (comma) |
|
Retouch |
z |
|
Eraser |
e |
|
Picture Tube |
. (period) |
|
Airbrush |
u |
|
Flood Fill |
f |
|
Text |
x |
|
Line |
i |
|
Shape |
/ |
|
Vector Object Selection |
q |
SIZE
Resize |
Resize Dialog |
BACKGROUND - Background vs. Background Layer
A background layer is not the same as a background.
When you create a new image and choose transparent as the background color, the new image
contains a transparent layer floating above the background, which appears checkered. This
transparent layer, which is always labeled �Layer 1,� can be moved in the layer stack. It
is a layer, not a background. The background cannot be moved.
When you create a new image and choose a color other than transparent, the image consists
of a Background layer in the selected color. A Background layer, like a background, cannot
be moved within the stack. However, unlike a background, a Background layer can be promoted
to a �regular� layer.
To promote a Background layer, use one of the following methods:
� Right-click the Background button on the Layer palette and choose Promote to Layer
from the pop-up menu.
� Open the Layer Properties dialog box. Notice that the dialog box is actually named
Promote Layer and Edit Properties. Rename the layer and close the dialog box. You can
now move it.
FILE FORMAT - Transparent Gif
Choose File Menu -> Export -> Transparent GIF or click the optional Export
Transparent GIF toolbar button to open the Transparent GIF Saver dialog box, where you
can view the image as you configure the transparency, color reduction, and other format
options. To create a transparency from a selection, make the selection before opening
the dialog box.

You can configure the settings in the tabbed pages or click the Use Wizard button and
let Paint Shop Pro guide you through the process.
FILTER - Mosaic
The Mosaic filter divides an image into rectangles or squares of a size you specify. To
apply the Mosaic effect, choose Image > Other > Mosaic to open the Mosaic Dialog box.
Notes
You can apply filters to greyscale and 24-bit images. If necessary, increase the color
depth of your image to make the commands available.
To apply a filter to a selection, create the selection before choosing the filter.
To apply the Mosaic filter:
1 Use the two preview boxes to see a before and after view of the image. The box on the
left shows the original image; the one on the right updates as you adjust the settings.
Click the button to zoom in and the button to zoom out. To bring other areas of the
image into view, either click the button and drag the navigation frame to a new position
or move the cursor over one of the boxes (the cursor becomes a hand) and drag the image.
2 To update the original image as you change the settings, select the �
Auto Proof� check box.
3 Select the block width and height in pixels.
4 To create square tiles, select the �Symmetric� check box. To create rectangular tiles,
clear the check box. When you don�t select symmetric blocks, you can reduce the image down
to 4 tiles.
5 If you did not select the �Auto Proof� check box, click the Proof button to see the
changes.
6 Click OK to close the dialog box and apply the filter.
LAYERS - Introduction
There are three types of layers in Paint Shop Pro. Raster layers contain pixel-based
information. Vector layers contain instruction data for drawing vector lines, shapes,
and text. Unlike raster layers, vector layers can be added to images of any color depth.
Adjustment layers contain color correction information; use them to change the appearance
of the underlying layers.
A newly created image consists of raster-type background layer. This is analogous
to the canvas of a painting; every image must have at least one layer. PSP supports up to
100 layers per image. The actual number of layers you can create may be further limited by
the amount of memory in your computer.
The Layer palette displays each layer, its order in the layer stack, its current
properties, and for a vector layer, a button for each vector object you draw. The Layer
Properties dialog box shows the settings for an individual layer, and it provides access
to the adjustment layer settings. The Layers menu contains the general commands for
creating, managing, and merging layers. It also lists the layers in the image.
Note
An image must be a grey scale or 24-bit color image to contain more than one raster
layer or an adjustment layer. To add these layers, increase an image�s color depth.
LAYERS - Layer Properties dialog
The Layer Properties dialog box always contains the General and Blend Ranges tabs. When you
create an adjustment layer, a third tab, which displays the settings for the type of
adjustment, also appears. At the bottom of the dialog box are a Proof button and �Auto Proof�
check box. Leave the check box selected to have Paint Shop Pro automatically update the
image as you change the tab settings. If you clear the check box, click the Proof button
to view changes before applying them. Click OK to close the dialog box and apply the
settings.
The dialog box automatically opens when you create a new layer using one of the following
methods:
� Clicking the Create Layer button on the Layer palette. This creates a raster layer.
� Clicking the Create Raster Layer button on the toolbar to create a raster layer.
� Right-clicking the Create Layer button and choosing New Raster Layer, New Vector Layer,
or New Adjustment Layer from the pop-up menu. For an adjustment layer, choose one of the
layer types.
� Right-clicking a Layer button and choosing New Raster Layer, New Vector Layer, or New
Adjustment Layer from the pop-up menu. For an adjustment layer, choose one of the
layer types.
� Choosing Layers > New Raster Layer, Layers > New Vector Layer, or Layers, New Adjustment
Layer. For an adjustment layer, choose one of the layer types.
General Tab
The General tab contains the �Layer� panel and the �Mask� panel. The options within them,
except for the Layer Name, can also be controlled using the Layers palette. The default
names for new raster and vector layers are "Layer1," "Layer2," etc. The default name for
a new adjustment layer is the type of the adjustment. When you create a new layer, use a
name that will allow you to recognize the layer contents easily.
For information on the options in these panels, view the individual topics on the
following options:
General Tab Settings
Blend Mode Layer Visibility
Opacity Transparency Lock
Group Mask Options
Blend Ranges Tab
This tab contains the �Blend Ranges� panel. When you select a Blend Mode from the Layer
Properties dialog box or Layer palette, Paint Shop Pro applies the blend to all the pixels
in the layers. Use the Blend Range controls to limit the pixels that the Blend mode affects.
By setting opacity based on brightness or channel value, you can remove colors from the
current layer and make other colors show through.
Layer Blend Ranges
Adjustment Tab
The Adjustment tab contains the controls for the following adjustment layers: Levels, Curves, Brightness/Contrast, Color Balance, Hue/Saturation, Channel Mixer, Threshold, and Posterize.
The contents of the tab depend on the type of adjustment layer you choose. Because there are
Using the New Adjustment Layer Properties Box
Re-opening the Layer Properties Dialog Box
You can re-open the Layer Properties dialog box for a layer by doing one of the following:
� Clicking its Layer button on the Layer palette and choosing Layers > Properties.
� Right-clicking its Layer button on the Layer palette and choosing Properties from the
pop-up menu.
� Double-clicking its Layer button on the Layer palette.
PREFERENCES - Viewing
The Viewing preferences tab controls if and how Paint Shop Pro automatically sizes images
and image windows after using the Zoom tool, after creating an image, and after resizing
an image window.
Zooming
The Zooming options determine if Paint Shop Pro automatically resizes an image window when
you zoom in or zoom out. A window is resized to include as much of the image as will fit.
New Images
When the �Auto size� check box is selected, if you open an image that is too large to fit
in its image window, Paint Shop Pro automatically resets the image�s magnification so that
the entire image is visible.
After Changing Size
When the �Fit window to image� check box is selected, Paint Shop Pro automatically resizes
the image window whenever you resize an image.
When the �Auto Size� check box is selected, if you increase an image�s size to more than
can fit in its window, Paint Shop Pro reduces the image�s magnification accordingly.
SIZE - Resize
When you want to resize an image but not crop it or add new canvas around it, use the
Resize command. If you are creating a web page and have an image that is too large to
fit, you can resize it. You can also reduce the number of pixels in an image to make it
download more quickly.

To open the Resize dialog box, choose Image > Resize or click the Resize button on
the toolbar.

See.. Using the Resize Dialog Box
SIZE - Resize Dialog
Use the Resize dialog box when you want to resize an image but not crop it or add new canvas
around it. To change the dimensions of the image by adding pixels to or removing them from
the edges of the image, use the Change Canvas Size dialog box.
To use the Resize dialog box:
1 Select a method for resizing the image. You have three options:
� Pixel Size, where you select a new size by choosing a new measurement in pixels,
� Percentage of Original, where you select a new size based on a percentage increase or
decrease from the original, and
� Actual/Print Size, where you select a new size by changing the resolution or the
dimensions. Note that the two are linked.
2 Enter new measurements in the Width and Height boxes of the selected panel. In the
Actual/Print Size panel, you can also change the resolution.
3 In the Resize Type box, select the type of resizing for Paint Shop Pro to apply. There
are four choices:
� Smart size, where Paint Shop Pro chooses the best algorithm based on the current image
characteristics.
� Bicubic resample, which uses a process called interpolation to minimize the raggedness
normally associated with expanding an image. As applied here, interpolation smoothes out
rough spots by estimating how the "missing" pixels should appear, and then filling them
with the appropriate color. It produces better results than the Pixel resize method with
photo-realistic images and with images that are irregular or complex. Use Bicubic resample
when enlarging an image.
� Bilinear resample, which reduces the size of an image by applying a similar method as
Bicubic resample. Use it when reducing photo-realistic images and images that are irregular
or complex.
� Pixel Resize, where Paint Shop Pro duplicates or removes pixels as necessary to achieve
the selected width and height of an image. It produces better results than the resampling
methods when used with hard-edged images.
4 In an image with more than one layer, select the �Resize all Layers� check box to resize
the entire image. Leave the box unchecked to resize only the active layer.
5 To change the proportions of the image, select the �Maintain aspect ratio of� check box
and type a new ratio for the image width. Aspect ratio is the relationship of the image�s
width to height. By default, the Aspect ratio box displays the image�s current aspect ratio.
6 Click OK to close the dialog box and apply the changes.
Note
After resizing, many images can be improved by using the Sharpen filter.
Bilinear and Bicubic resampling are available only for grey scale images and 24-bit images.
To resample an image with a lower color depth, do the following:
1 Increase the image�s color depth.
2 Resize the image.
3 Reduce the image�s color depth to the original depth.
CROP - Cropping an Image
Cropping eliminates areas of an image. It has the same effect as using the Change Canvas
Size dialog box to reduce the dimensions of an image. If a scanned image contains unwanted
areas, cropping it should be your first step. You reduce memory needed to edit the
image and, by eliminating extraneous areas of color, you will make better color corrections.
After you have cropped the image, you can rotate it to correct any alignment problems.
Paint Shop Pro provides three ways to crop an image:
� Using the Crop tool,
� Using the Crop Area dialog box, and
� Using the Crop to Selection command.
Notes
When you crop a multi-layered image, you crop all layers of the image.
You can not apply the Crop to Selection command to a floating selection.
Crop Tool
When you use the Crop tool, you select the area of the image you want to keep. The area
outside the rectangle is deleted.
To use the Crop tool:
1 Click the Crop tool button on the toolbar.
2 Place the cursor over the image at a corner of the area you want to keep.
3 Press the left mouse button and drag. A rectangle appears. The area inside the rectangle
will be saved; the area outside the rectangle will be cropped.
4 When the rectangle encloses the area you want to keep, release the mouse button.
5 To change the area the rectangle encloses, do any of the following:
� Click one of the rectangle�s sides and drag to move it,
� Click inside the rectangle and drag to enclose a different area, or
� Right-click to remove the rectangle and start over.
6 To crop the image, either:
� Double-click inside the rectangle, or
� Click the Crop Image button on the Crop tab of the Tool Options palette.
Crop to Selection Command
The Crop to Selection command becomes available whenever an image contains a non-floating
selection. Use it with irregularly shaped selections. It deletes everything except the
selection and reduces the image size to the length and width of the selection.
To apply the command, choose Image -> Crop to Selection or press <Shift> + <R>.
Creating a Selection
Crop Area Dialog Box
If you know the coordinates of the image area you want to crop to or if you want to crop
the area of the image that does not contain any data, use the Crop Area dialog box.
To open the dialog box, double-click the Crop tool button on the toolbar.
see.. Using the Crop Area Dialog Box
Related Topics
Using the Change Canvas Size Dialog Box
Making Color Corrections
Rotating an Image
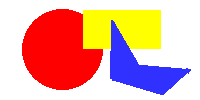
IMAGE MAPS - Coordinates
from..
Karren J. Wcisel (wcisel.com)
Determining Image Size and Map Coordinates

Open your image file in Paint Shop Pro 6

Determine Image Width and Height
The width and height should appear in the lower right corner of the Paint Shop Pro window
(see C and D in the figure on previous page) This did not work properly for me in Paint Shop
Pro 7, but holding the Shift - I keys will bring up the Image Information dialog box which
displays the image size. Enter the width and height in the appropriate place in your
Image Map Data Chart.

Determine Coordinates for the Image Map
Choose the arrow tool. Move it slowly over the image. The coordinates of the tip of the
arrow will appear on the left end of the status bar.

Using the diretions below, carefully record the data on your Image Map Data Chart

Circle
Point to center, write down the number
the first number is x1, the second is y1

Point to right edge (or estimate where it is)
the first number is x2, the second is y2

if you've been careful, y1 and y2 should be equal or very similar)
Subtract x1 from x2 - that's the radius r

Coordinates are x1,y1,r

Rectangle
Point to top, left corner, write down these values for x1, y1
Point to bottom, right corner, these will be x2, y2
Coordinates are x1, y1, x2,y2

Polygon
Start at some vertex and write down the x,y coordinates for each vertex of the polygon
(be sure to go in sequential order along the sides of the shape).

Close Paint Shop Pro

Tags for the figure below are as follows (coordinates were determined as above).


<img src="colors.gif" width="200" height="100" border="0" usemap="#map1">

<map name="map1">
<! Polygon: list the pair of (x,y) coordinates for each vertex >
<area shape="POLYGON" coords="111, 19, 139, 64, 192, 69, 162, 95, 109, 79" href="polygon.htm" alt="blue polygon">

<! Rectangle: list x,y coordinates of upper left and lower right vertices >
<area shape="RECT" coords="82, 9, 162, 50" href="rectangle.htm" alt="yellow rectangle">

<! Circle: list x,y coordinates for the center, then the radius >
<area shape="CIRCLE" coords="62, 49, 41" href="circle.htm" alt="red circle">

<! close the map tag >
</map>
Place the mouse over one of the shapes below. Press down and do not release. In Internet
Explorer, you may see a dotted line showing defined Area Shape.